

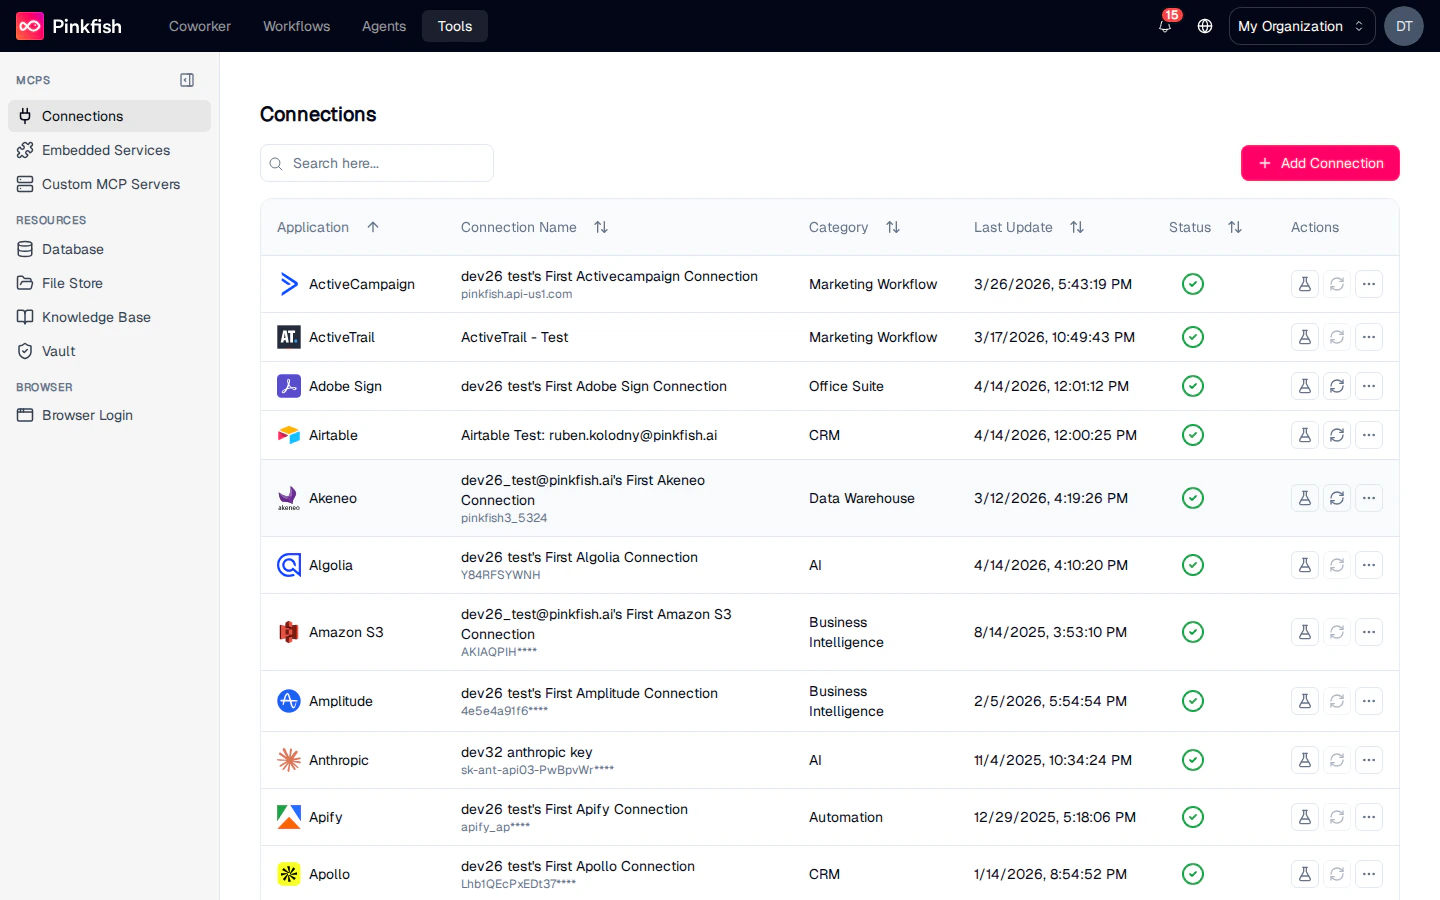
The Connections List
Each row represents one established connection — an app plus the credentials that let Pinkfish talk to it. Columns:
Shared connections show a small icon next to the name with the tooltip “Shared”.
Row actions

Delete opens a confirmation dialog titled “Delete Connection” with the text “Are you sure you want to delete the connection?” — click Confirm to remove it. On success a toast reads “Connection deleted successfully.”
Adding a Connection
Click Add Connection in the top right. The integration picker opens.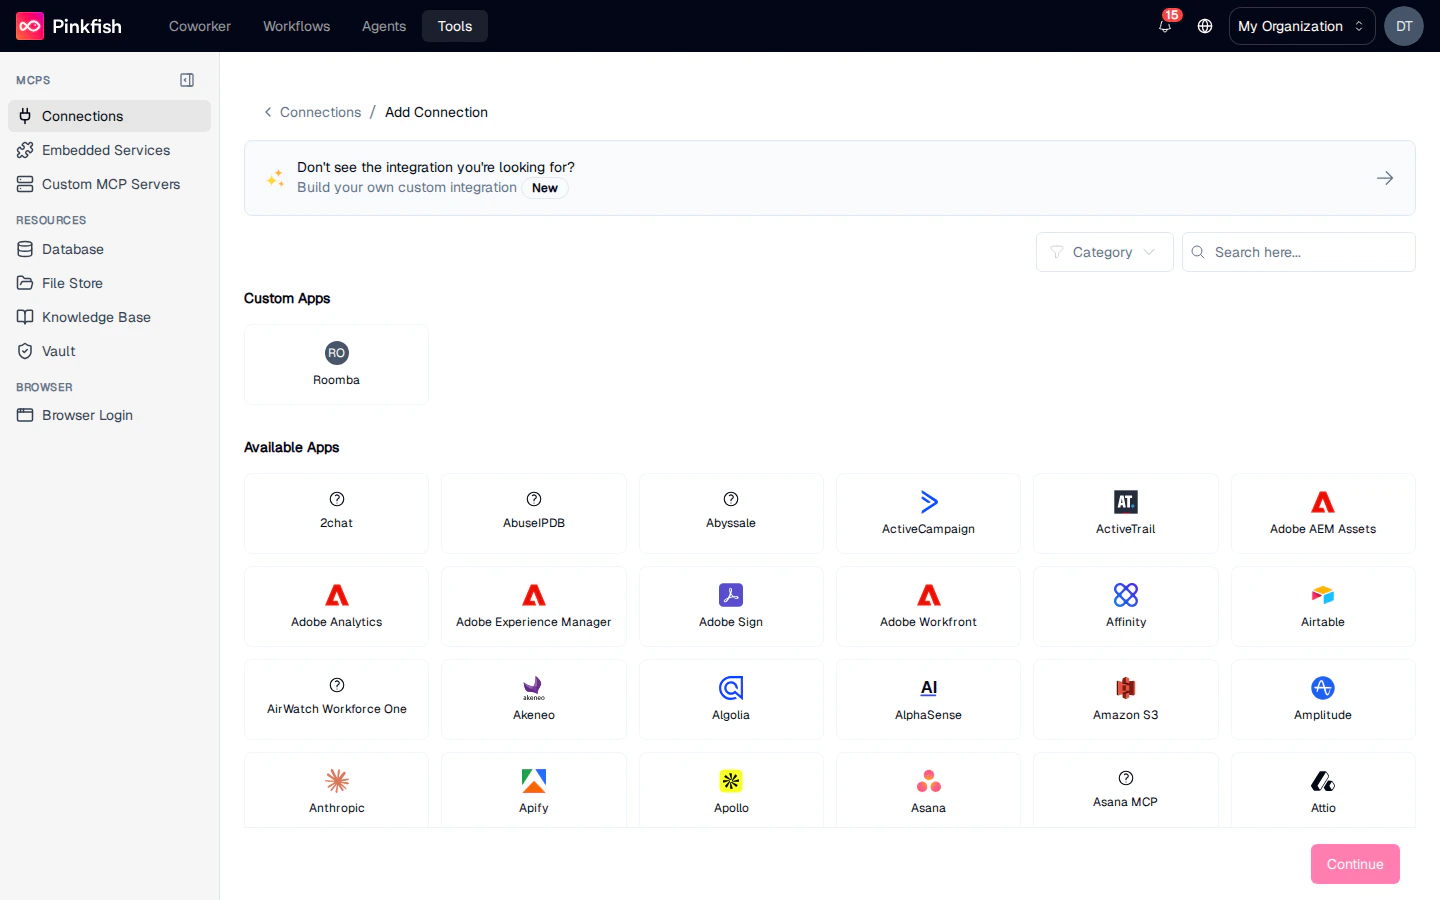
- “Don’t see the integration you’re looking for?” — a banner linking to the custom integration builder.
- Custom Apps — apps your org has already built and registered (if any).
- Available Apps — the full catalog of pre-built Pinkfish integrations.
Restricting Which Tools a Connection Can Use
The connection form has a Tool Access (optional) section with two choices:- Allow all tools (default) — any tool the app exposes may be used through this connection.
- Restrict to specific tools — pick up to 50 tools; every other tool call through this connection is refused.
The restriction matches whole tool names. A general-purpose tool that takes an arbitrary URL or query is either allowed or not — the list cannot constrain what that tool is asked to do.
Testing a Connection’s Tools
For any connection with MCP tools available, clicking the flask icon opens the Tools dialog. The left side lists every MCP server and tool the app exposes; the right side shows a parameter form and a Select a Tool placeholder until you pick one.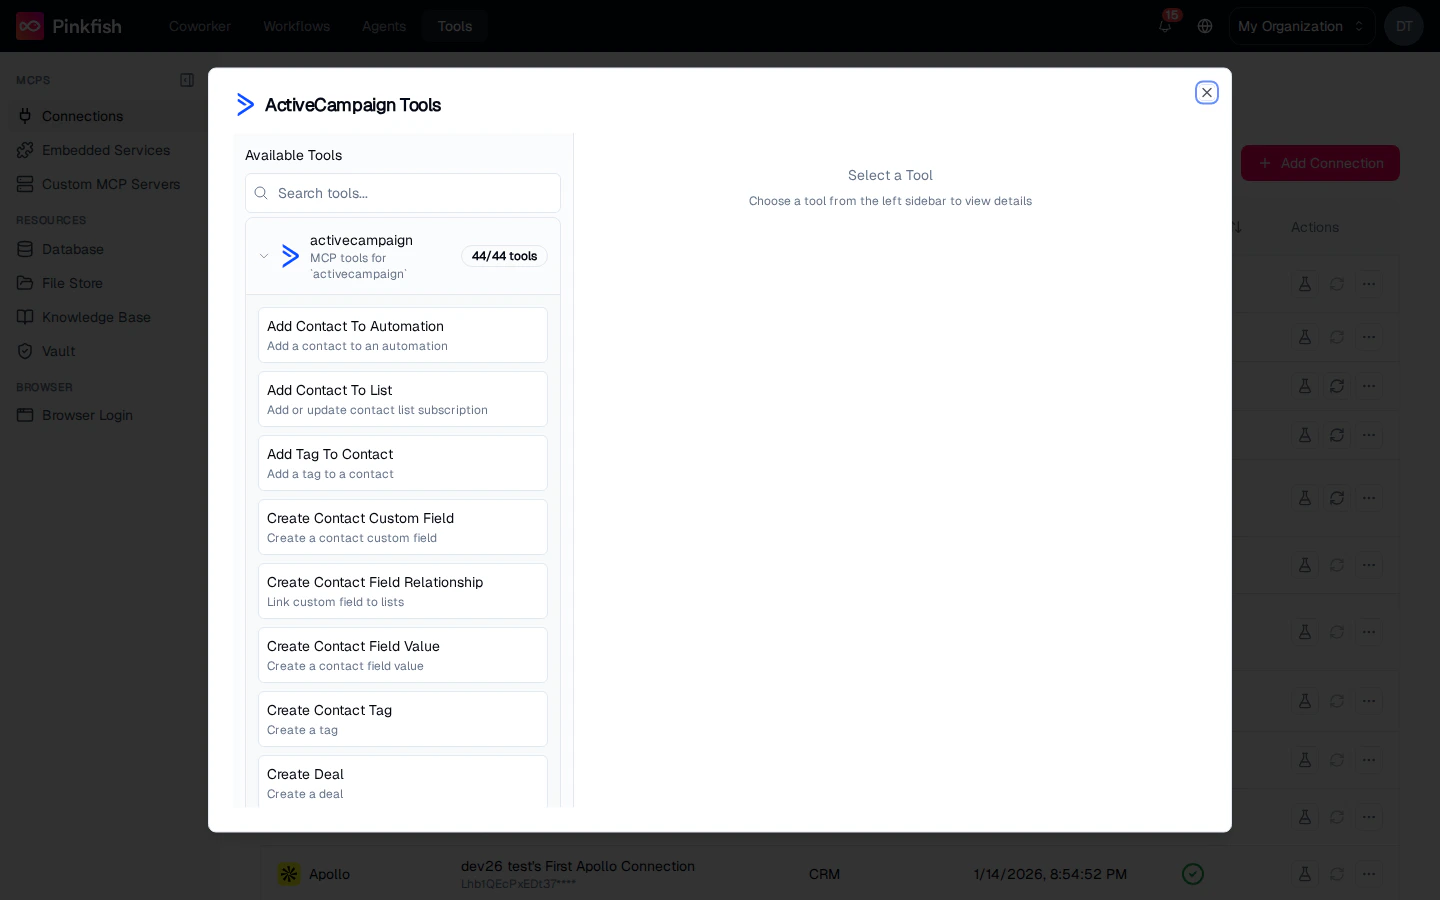
- Expand a server (e.g.
activecampaignwith 44/44 tools) to see its tools. - Select a tool.
- Fill in the parameters in the form on the right.
- Click the run button to execute; the response panel shows the live output.
Building a Custom Integration
When the app you need isn’t in the catalog — or you want to wrap your own internal API — click Build your own custom integration from the Add Connection banner. Pinkfish walks you through a three-step wizard: Basic Info & Auth Type → Auth Configuration → MCP Server Setup.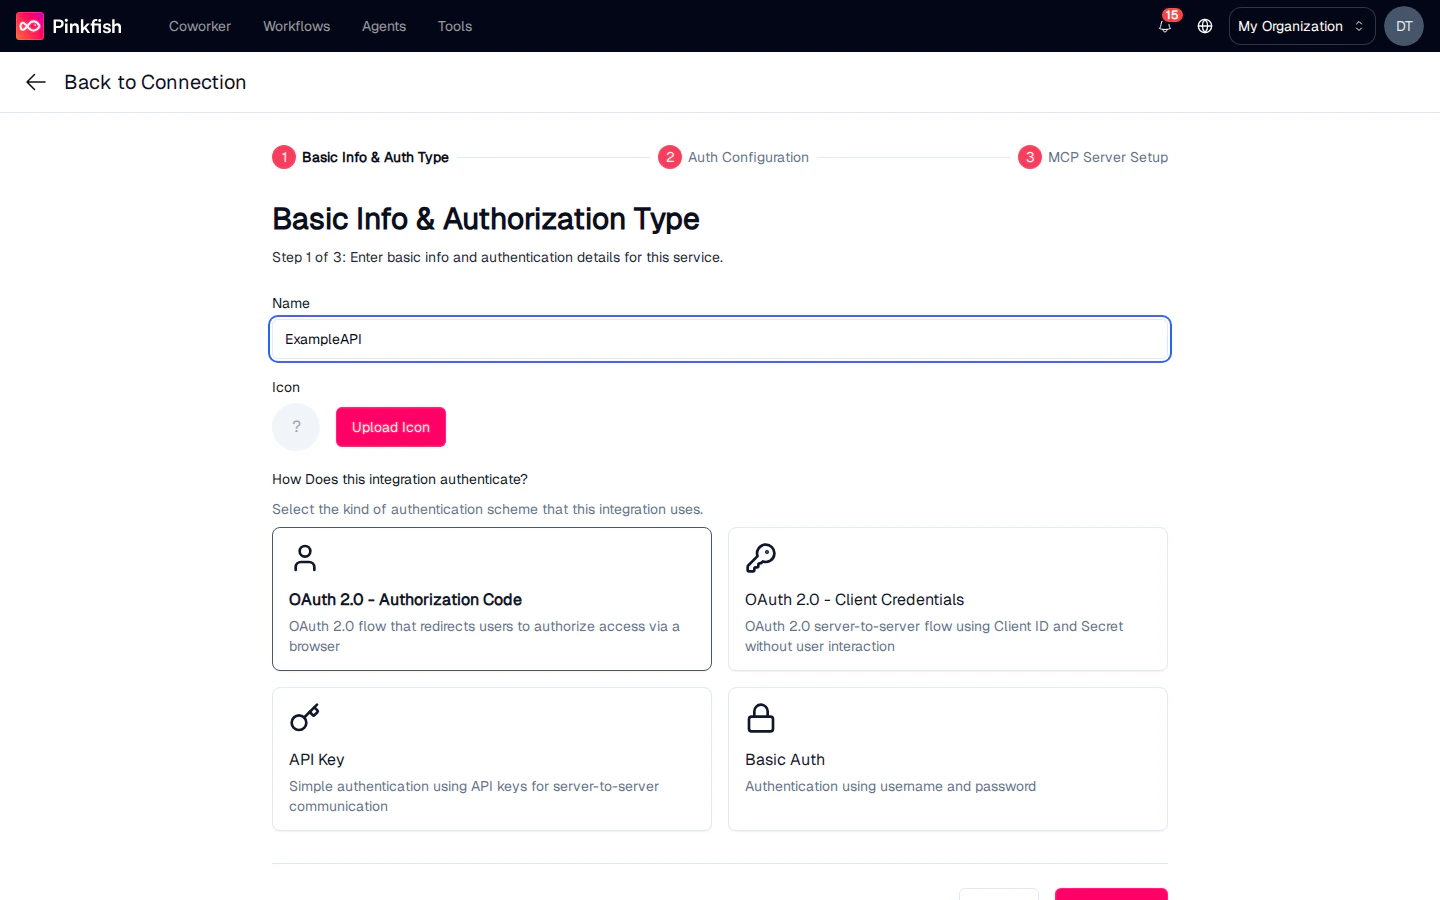
Step 1: Basic Info and Auth Type
Fill in a name and (optionally) upload an icon. Then pick one of four authorization types:OAuth 2.0 — Authorization Code
User-facing OAuth flow that redirects each user to authorize access in a browser. Use for apps that let end users bring their own accounts (Google Workspace, Microsoft 365, GitHub, etc.).
OAuth 2.0 — Client Credentials
Server-to-server OAuth 2.0 flow using a Client ID and Client Secret, no user interaction. Use for machine-to-machine access to a single service account.
API Key
Single API key (in a header or query string) for every call. The simplest setup for services that issue a long-lived secret.
Basic Auth
Username + password authentication. Pinkfish encodes the pair into the
Authorization: Basic … header on every request.Step 2: Auth Configuration
The second step is tailored to the auth type you picked. Every variant asks for an API Base URL and a Test Endpoint URL Path so Pinkfish can validate the credentials against a real call.API Key
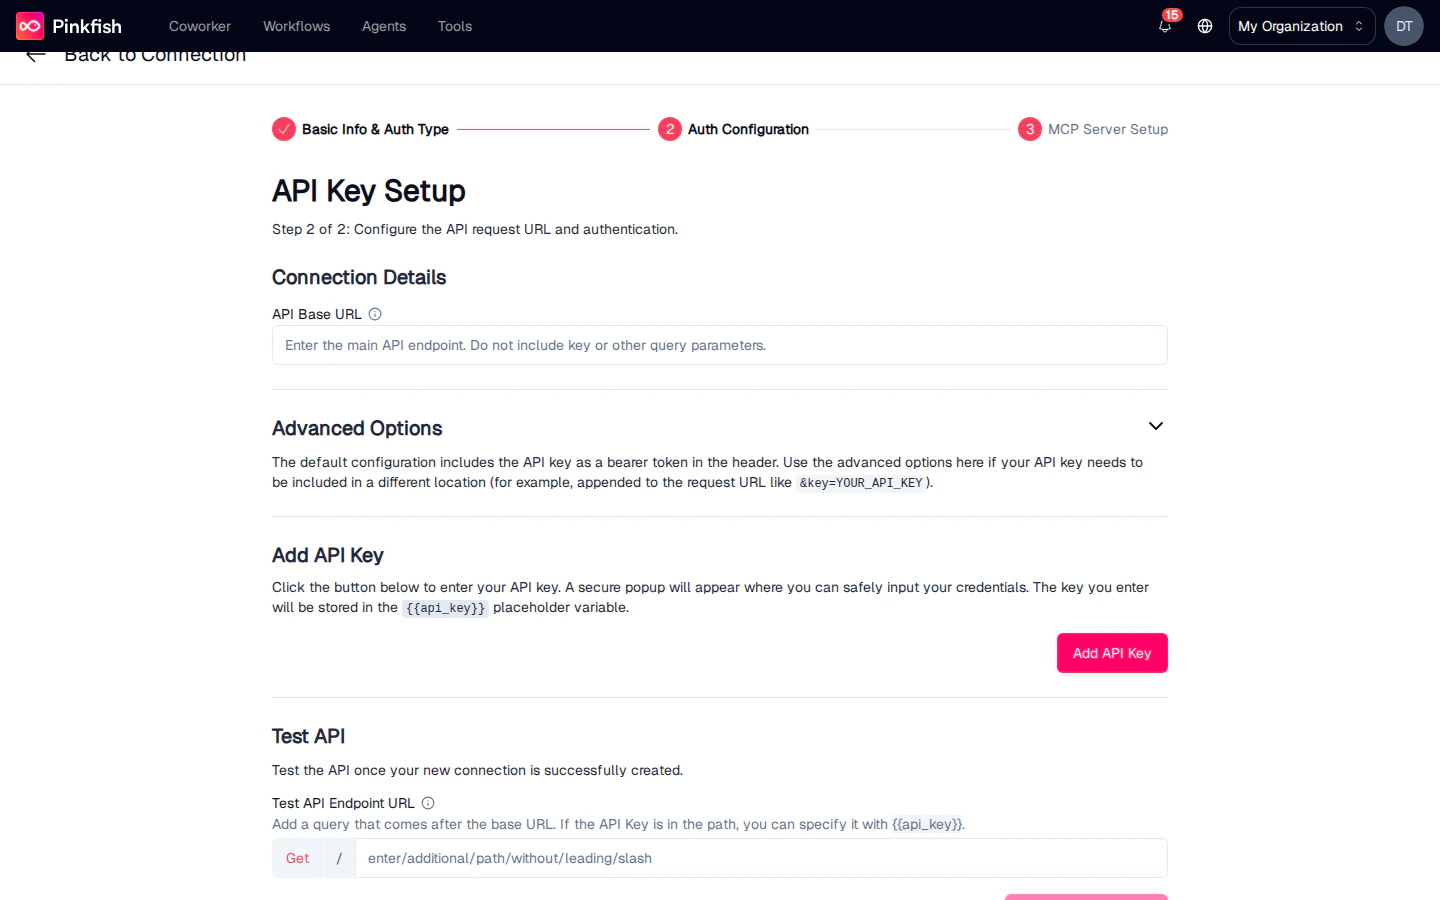
- API Base URL — the root of the service (e.g.
https://api.example.com). - Advanced Options — how the key is attached. By default Pinkfish includes the key as a header
x-api-key: {{API_KEY}}, but you can switch to a query-string parameter or set a custom header name. - Add API Key — paste the key into the secure field. Keys never appear in plain text after saving.
- Test API — run a request against the test endpoint to confirm everything is wired up before saving.
Basic Auth
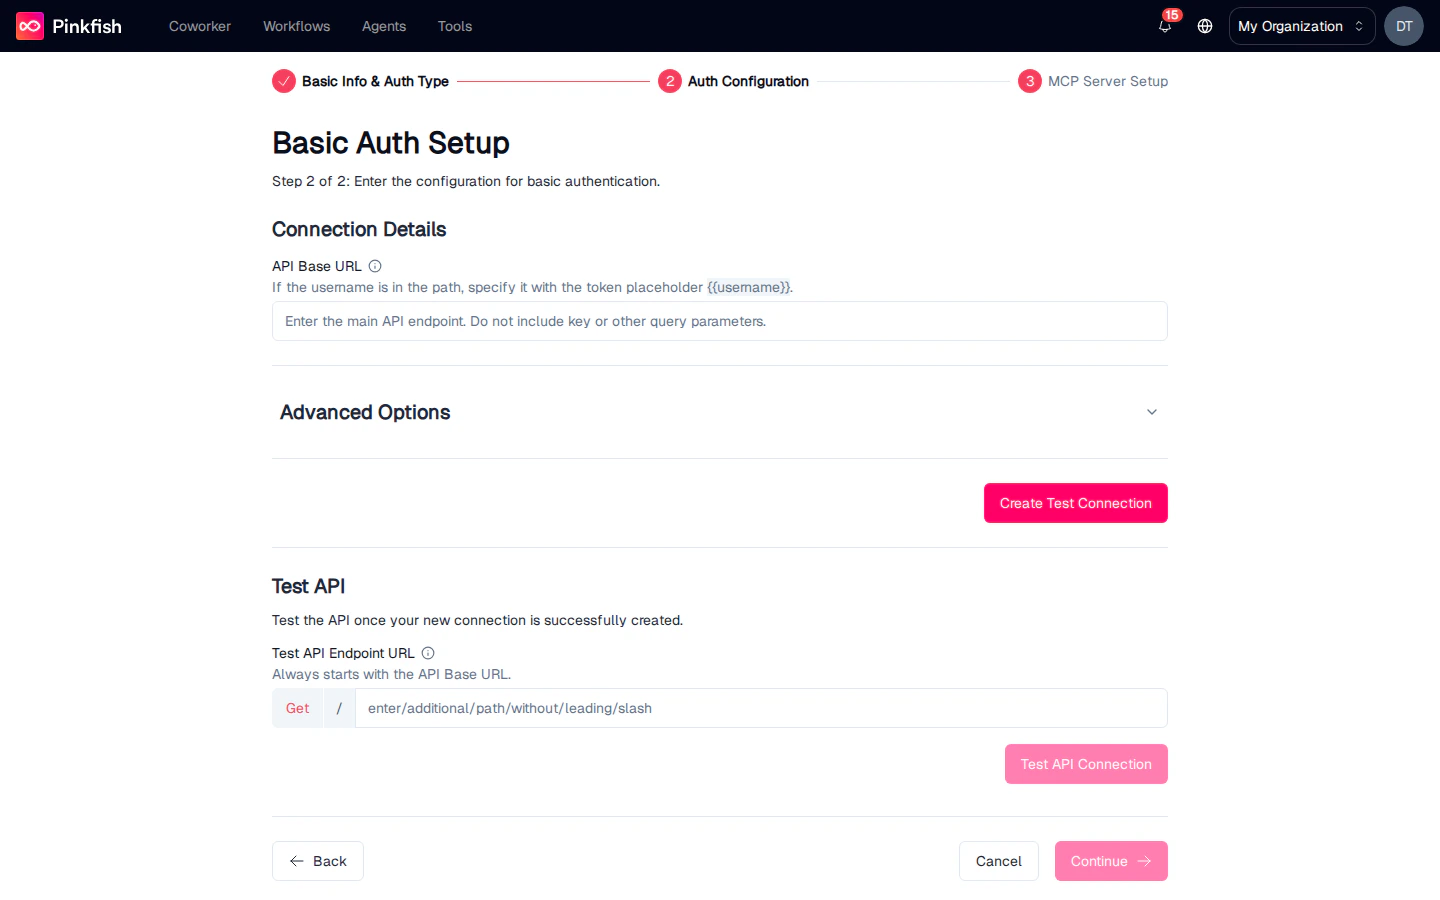
- API Base URL — the root URL.
- Username and password are collected when the user creates a connection from this integration, not when the integration itself is defined. The configuration step just says where to send them.
- Advanced Options expose placeholders like
{{USERNAME}}and{{PASSWORD}}so you can embed the values into custom headers or query parameters when needed. - Test API — validate against the test endpoint.
OAuth 2.0 — Authorization Code
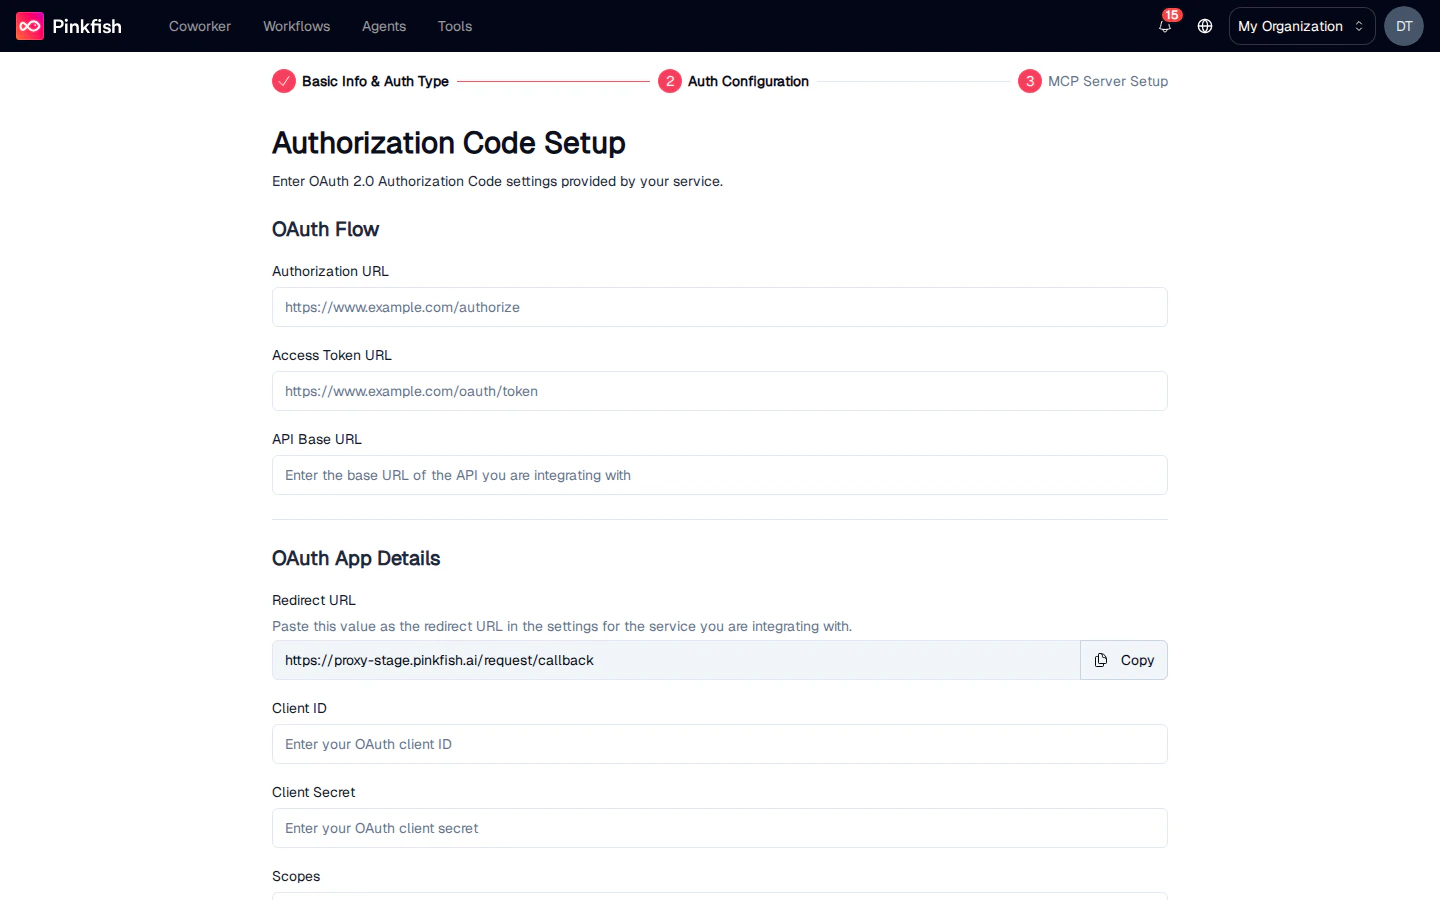
- Authorization URL — where Pinkfish sends users to log in (e.g.
https://auth.example.com/oauth/authorize). - Access Token URL — the endpoint that exchanges the code for a token.
- API Base URL — the root of the service being integrated.
- Redirect URL — Pinkfish provides this value on the page. Copy it and register it with the upstream provider as an allowed redirect URI.
- Client ID and Client Secret — issued by the upstream provider when you register a new OAuth app.
- Scopes — space-separated list of permission scopes to request.
OAuth 2.0 — Client Credentials
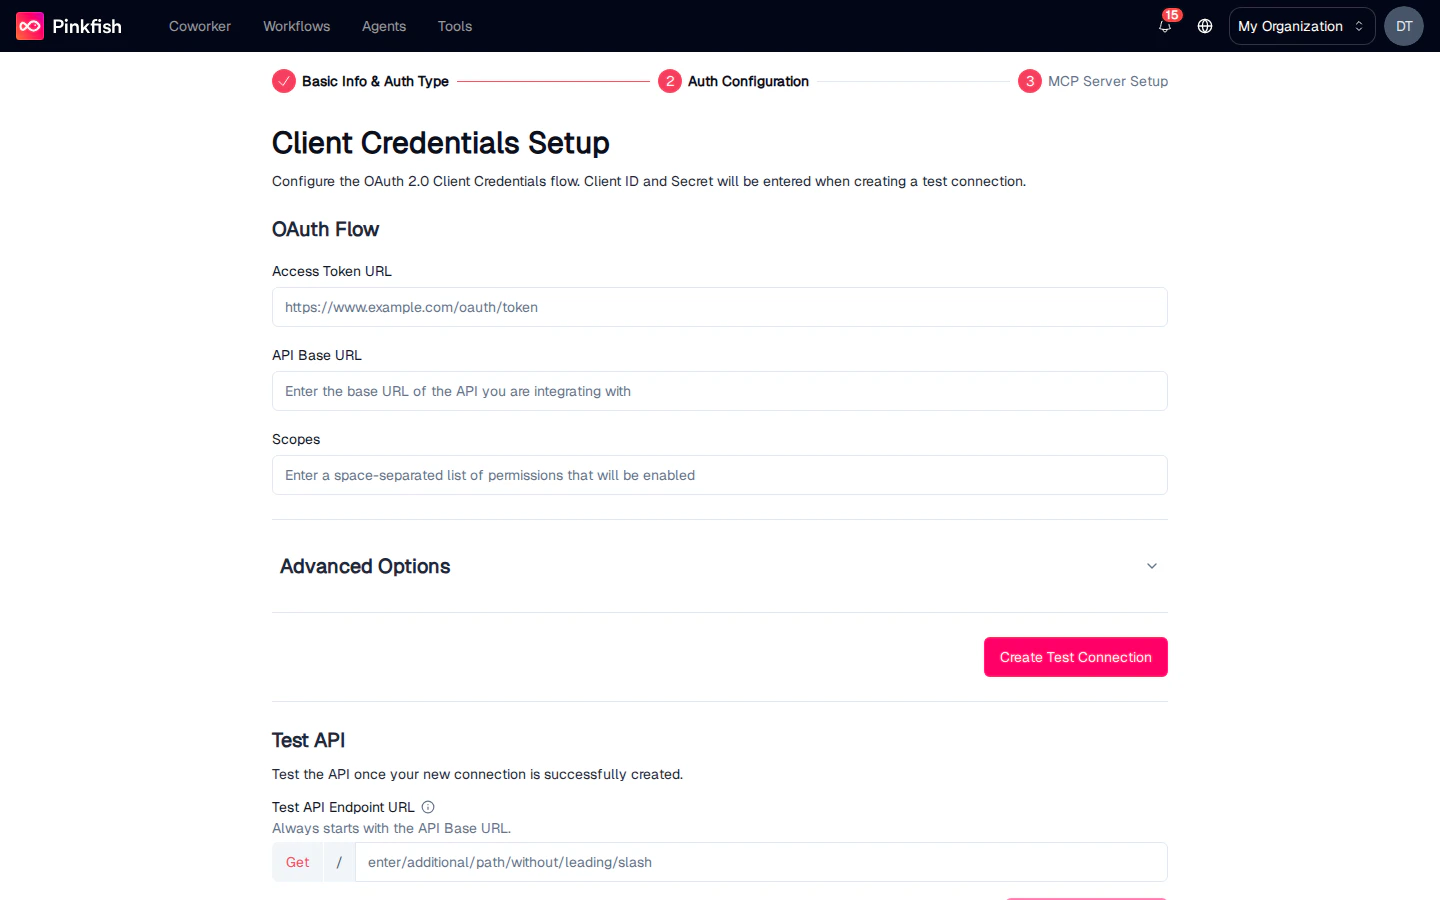
- Access Token URL — the token endpoint.
- API Base URL — the root URL.
- Scopes — space-separated scopes.
- Client ID / Client Secret — collected when each user connects, not here.
- Test API — validate with real credentials in the Create Test Connection side panel.
Step 3: MCP Server Setup
This is what makes a custom integration useful to agents. Map the integration to an existing MCP server, or generate a new one straight from your API’s OpenAPI spec.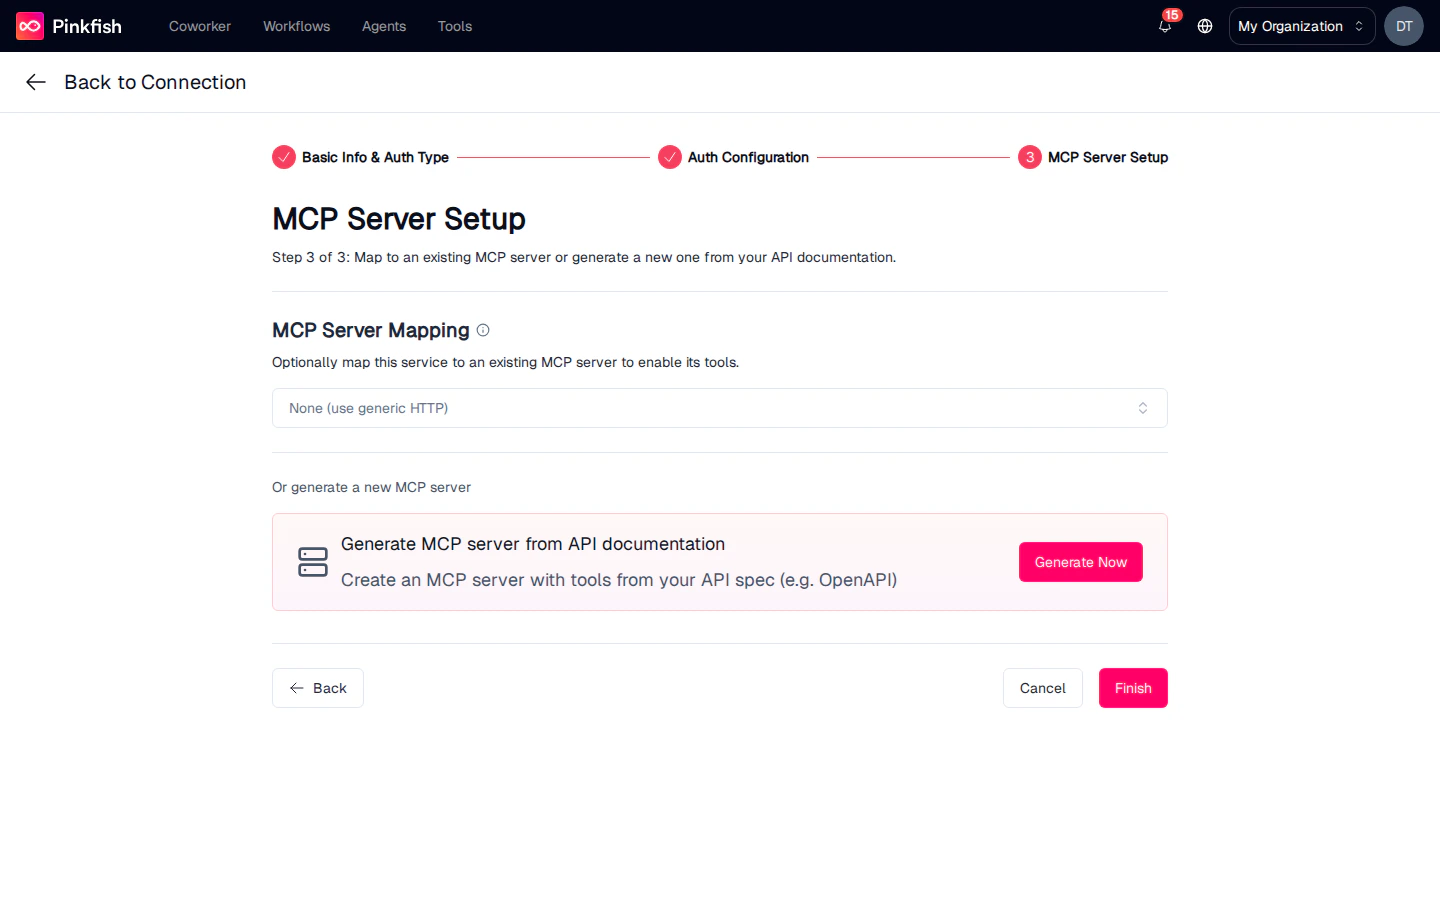
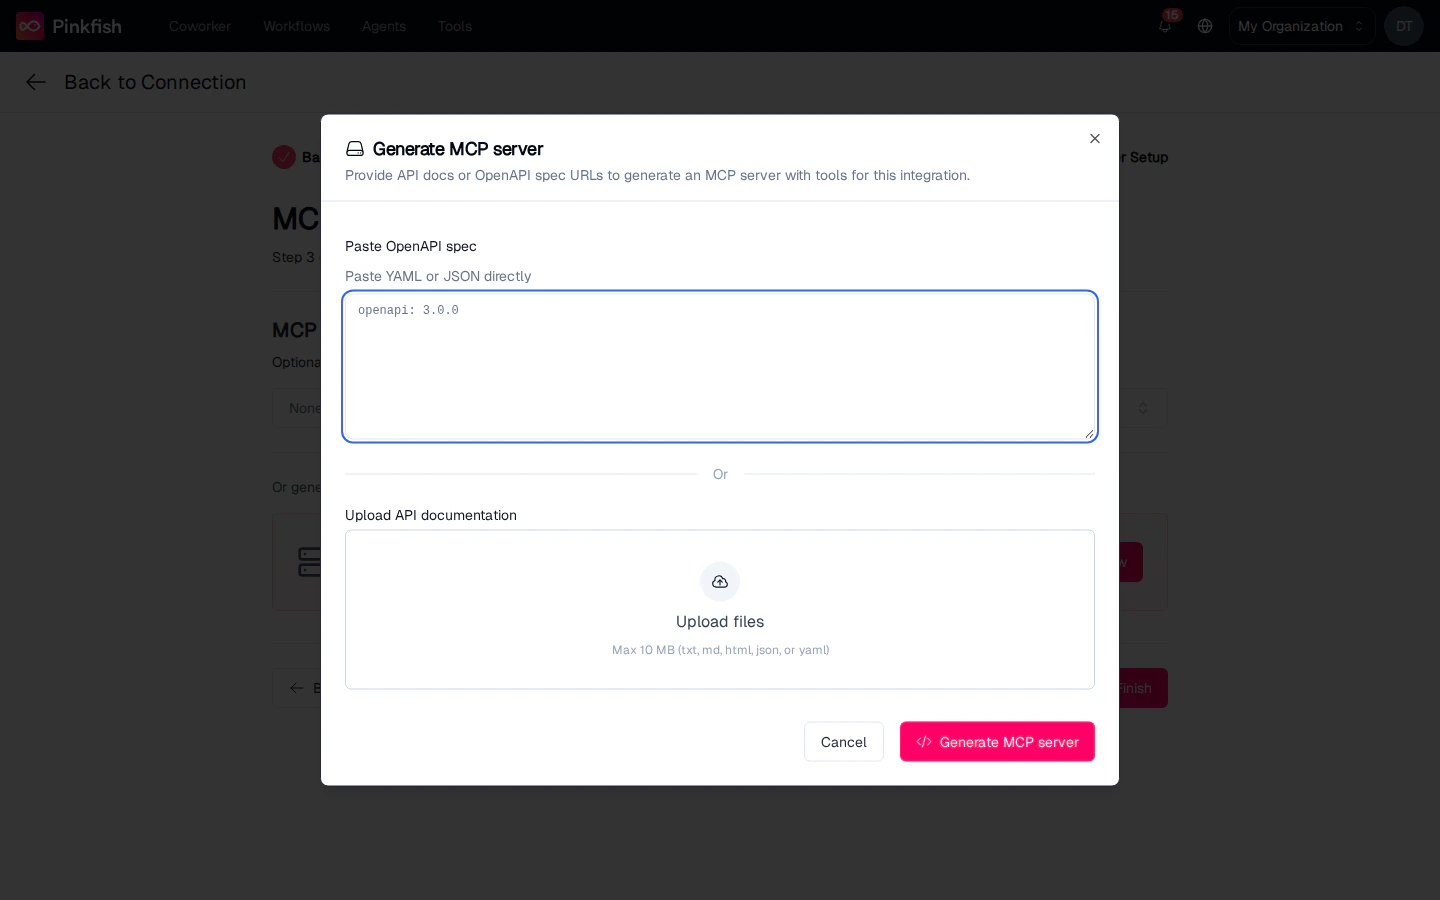
- Paste OpenAPI spec — paste YAML or JSON directly into the textarea. Must be an OpenAPI 3.x document.
- Upload API documentation — drag and drop up to 10 MB of txt, md, html, json, or yaml files.
MCP server "{name}" created with {N} tools. The server will appear on the Custom MCP Servers page, and on the integration itself so connections built from it automatically get the new tools.
Click Finish on Step 3 to save the integration. It then shows up in the Custom Apps section of the Add Connection picker, available to every Builder in your org.
Sharing and Permissions
Every connection has an owner and an ACL. Underneath, three permission bits govern what a holder may do:
The share dialog exposes these as two choices — Run (read) and Manage (read, write, and share). Click Share on a row to grant either to named people or to your entire organization. Shared connections appear on the recipient’s Connections list with the “Shared” indicator.
Sharing an agent or workflow does not share the connections it uses — credentials live on the connection, not on the agent. To make everyone run against one connection instead of their own, see Tool Sharing and Identity.
Notes
- The Connections list paginates at 50 rows; use the search box to filter.
- Custom integrations are currently limited to OAuth 2.0 (Authorization Code + Client Credentials), API Key, and Basic Auth. Other flows (SAML, mTLS) aren’t supported yet — contact support@pinkfish.ai if you need them.
- Generated MCP servers are editable after creation — you can remove unwanted tools or adjust parameters from the Custom MCP Servers details panel.
- For services that don’t expose an API at all, see Browser Login.